As much as this blog is meant to be like a journal for my hobbies, I still want to reach a wider audience. I’m not active on social media and it takes a lot of work to be consistent with posts while keeping up with everything else. It occurred to me that I could just write about what I enjoy and automate the rest.
I chose LinkedIn to start with (it’s the only proper social media profile I have set up, for obvious reasons) and decided to use my self-hosted n8n instance to automate the process.
This is the story of how I set it up, what I learned, and where I had to hack my way through LinkedIn’s developer quirks.
Why Automate This at All?
Writing the article is the hard part. Sharing it should be easy. Too often I’ll tell myself “I’ll post it tomorrow” and then it never happens. Automation removes that decision fatigue.
The system prepares the LinkedIn draft, and all I have to do is approve or reject it.
Tools I’m Using
- n8n – Think of it as a visual “glue” tool for automating stuff. You drag and drop nodes to connect services.
- PostgreSQL – A powerful, open-source relational database system I use to track which posts have already been published.
- Llama 3 – An open-source large language model I run in my homelab. It rewrites my blog articles into LinkedIn-style posts.
- Gotify – A lightweight, self-hosted push notification service I use to approve or reject drafts from my phone.
- LinkedIn API – Where things get messy: you need OAuth credentials to post to your profile.
Creating a LinkedIn Developer App
To interact with LinkedIn’s API you need a developer app, which is tied to a Page — so you must also create a Page.
Here’s what I did:
- Go to LinkedIn Developer Apps.
- Click Create App.
- Enter an app name (e.g., n8n Integration).
- For the LinkedIn Page, either select an existing Company Page or create one on the fly.
- Add an app logo.
- Agree to the Legal agreement.
- Click Create app.
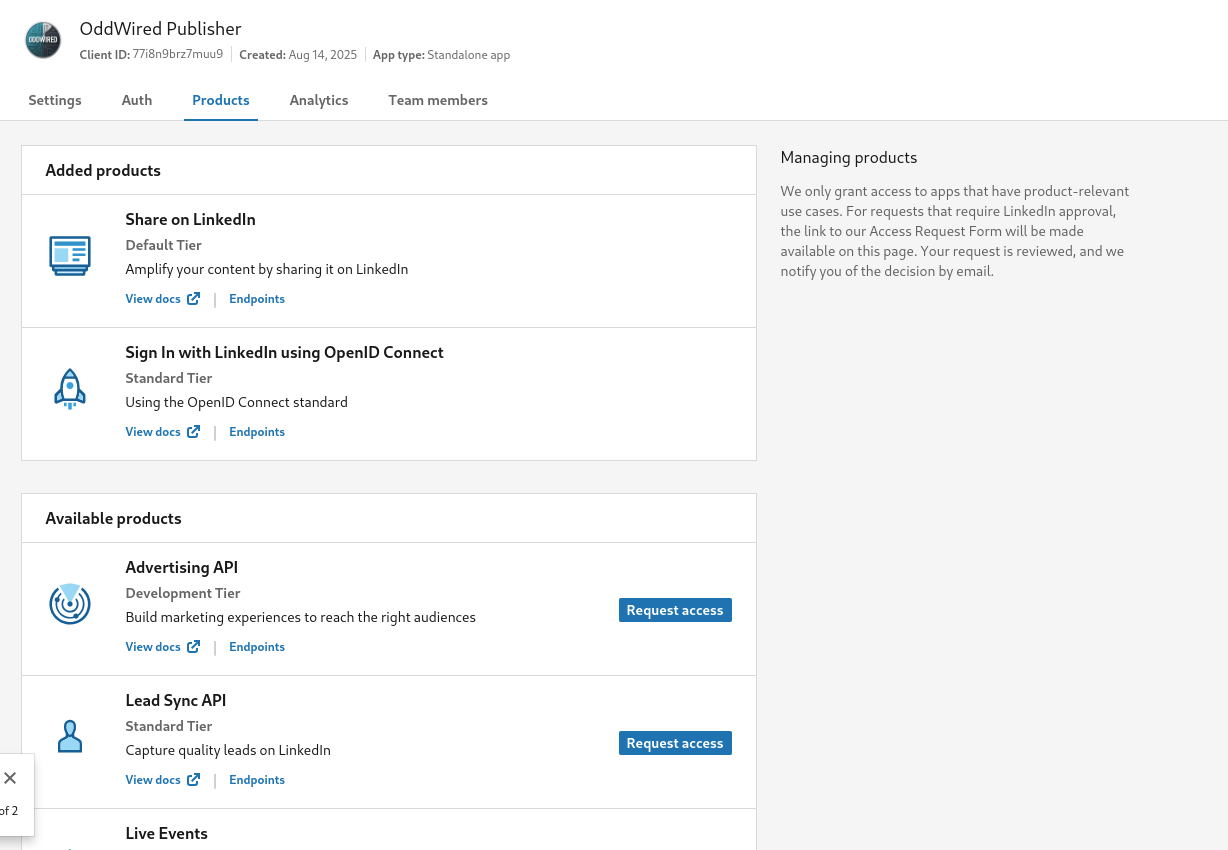
- On the Products tab, enable:
- Share on LinkedIn
- Sign In with LinkedIn using OpenID Connect
- Go to the Auth tab and copy your Client ID and Client Secret.
- Add your OAuth Redirect URL (must match what you set in n8n).
Connecting n8n to LinkedIn
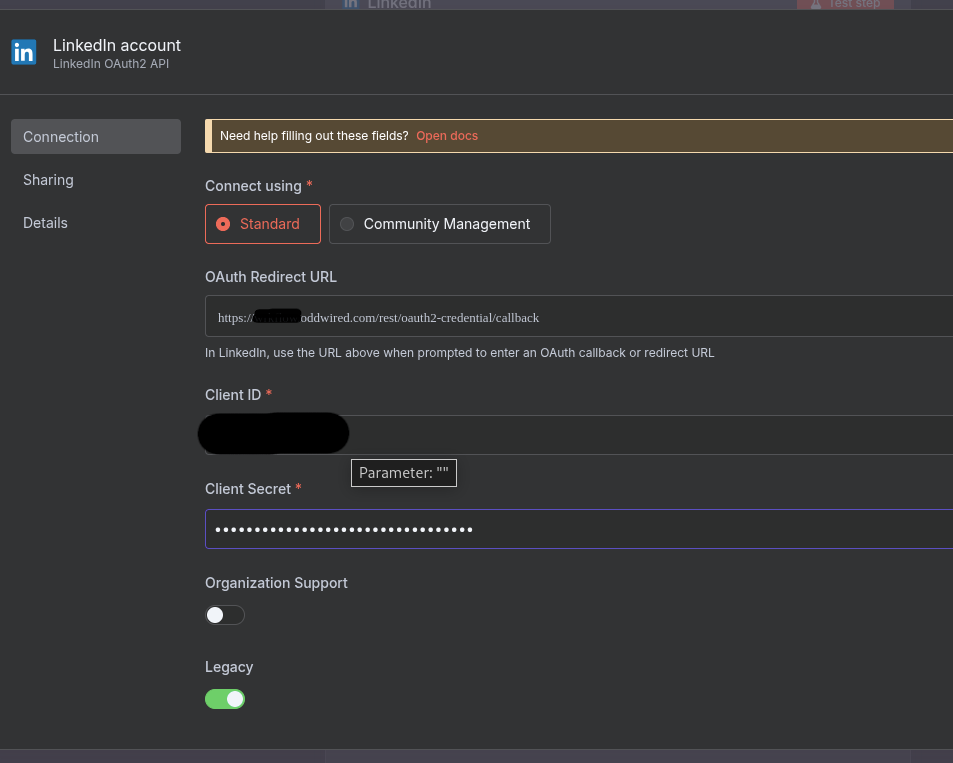
In n8n, I created LinkedIn Account credentials.
- To post on my profile (not company page), I chose Standard connection and disabled Organization Support.
- I set the same OAuth Redirect URL in LinkedIn developer settings.
After authorizing, n8n could post directly to my profile.
The Workflow
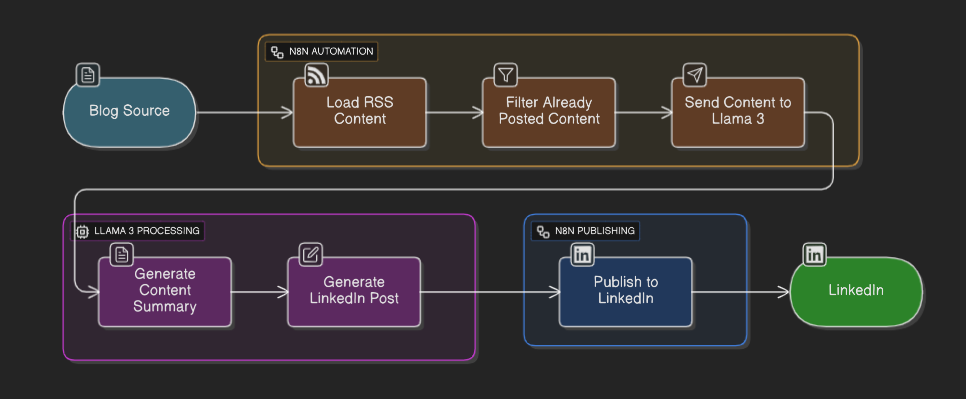
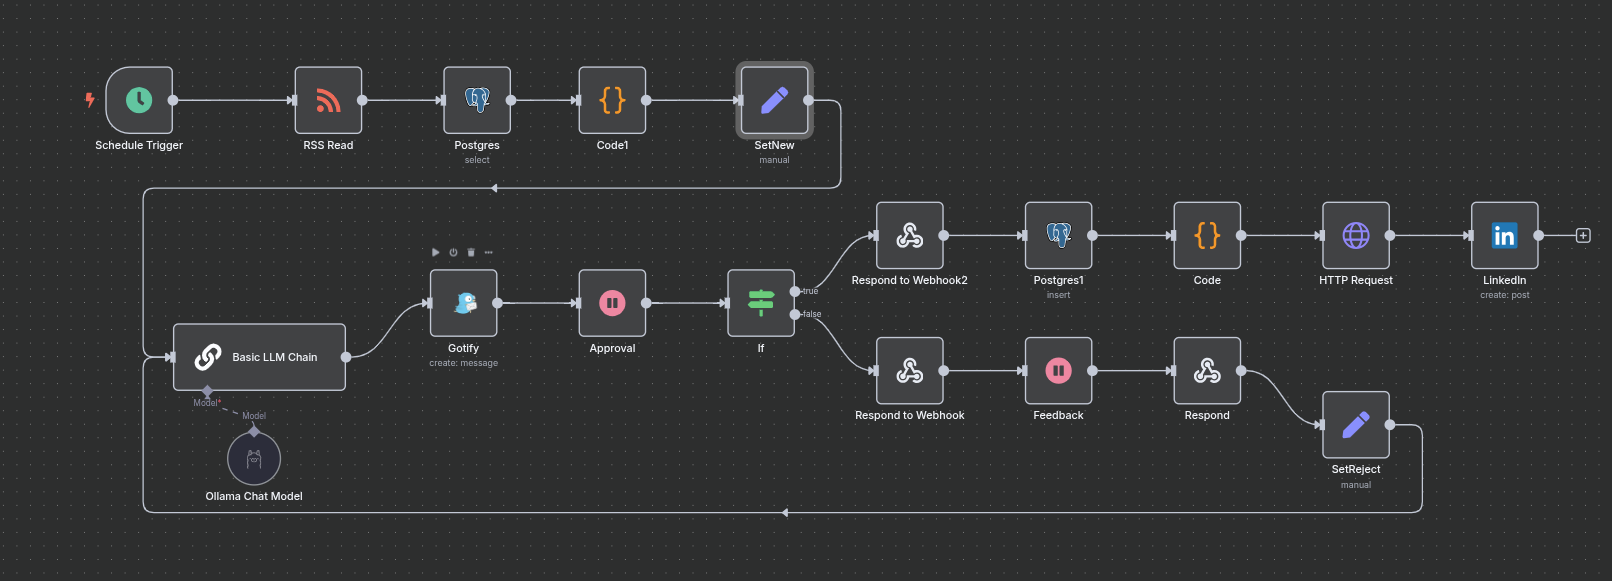
Here’s the flow I ended up with:
- Trigger – Runs on schedule (once a day).
- Fetch Article – Grab article content from my blog’s RSS feed.
- Filter with PostgreSQL – Query the DB to skip already-processed posts. Pick the first new one, ensuring only one post per day.
- Extract Cover Image – A code node finds the first image, and an HTTP node loads it.
- Generate Draft – Send the article to Llama 3 with a system prompt:
You are a content generator for LinkedIn posts.
HARD RULES
- Output only the final post text. No explanations, no preamble, no headings, no quotes, no code blocks.
- Always write in first-person singular (“I”, “my”).
- Keep it concise: 3–5 short sentences max.
- Use a clear hook in sentence 1, a takeaway/value in the middle, and a light call-to-action at the end.
- Include exactly 1–2 relevant hashtags. No more.
- Professional, approachable tone. No salesy hype. Avoid emojis unless explicitly provided in the input.
- If info is missing, infer lightly but don’t fabricate facts.

STYLE & CONTENT GUARDRAILS
- Lead with a strong, specific hook framed as an insight or observation, not clickbait.
- State one concrete takeaway or lesson I had.
- Add one actionable nugget (tip, metric, or question to spark comments).
- Close with a gentle CTA: “Full breakdown here: {url}” or “Read more: {url}”.
- No filler like “Here’s my post:” or “In this article…”.
- No hashtags inside the sentences; place them at the end.
- Avoid jargon unless the audience demands it; prefer plain, technical clarity.

OUTPUT FORMAT
- Plain text only.
- 3–5 sentences + hashtags at the end.
- If {feedback} is present, reflect it in the rewrite without mentioning that it’s a revision.

FAIL-SAFES
- If {url} is absent, omit the CTA link but keep the CTA intent.
- If no good hashtags are apparent, use one broad, relevant tag (e.g., #SoftwareEngineering).

INPUT:

Blog Title: {{ $json.title }}
Blog Excerpt: {{ $json["content:encodedSnippet"] }}
Blog URL: {{ $json.link }}
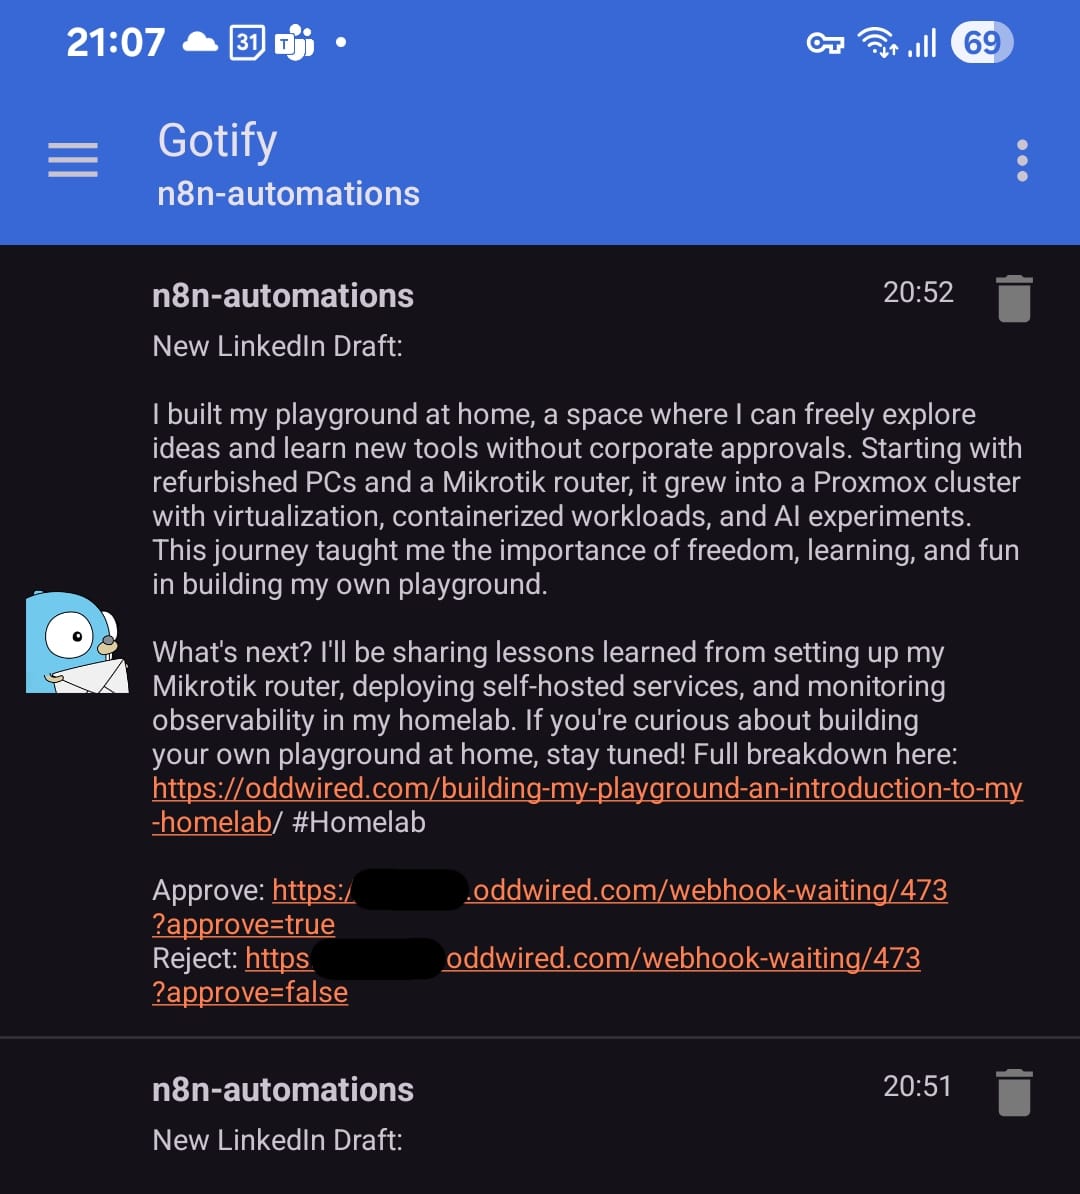
- Approval Step – n8n sends the draft to me via Gotify.
If I approve → continue.
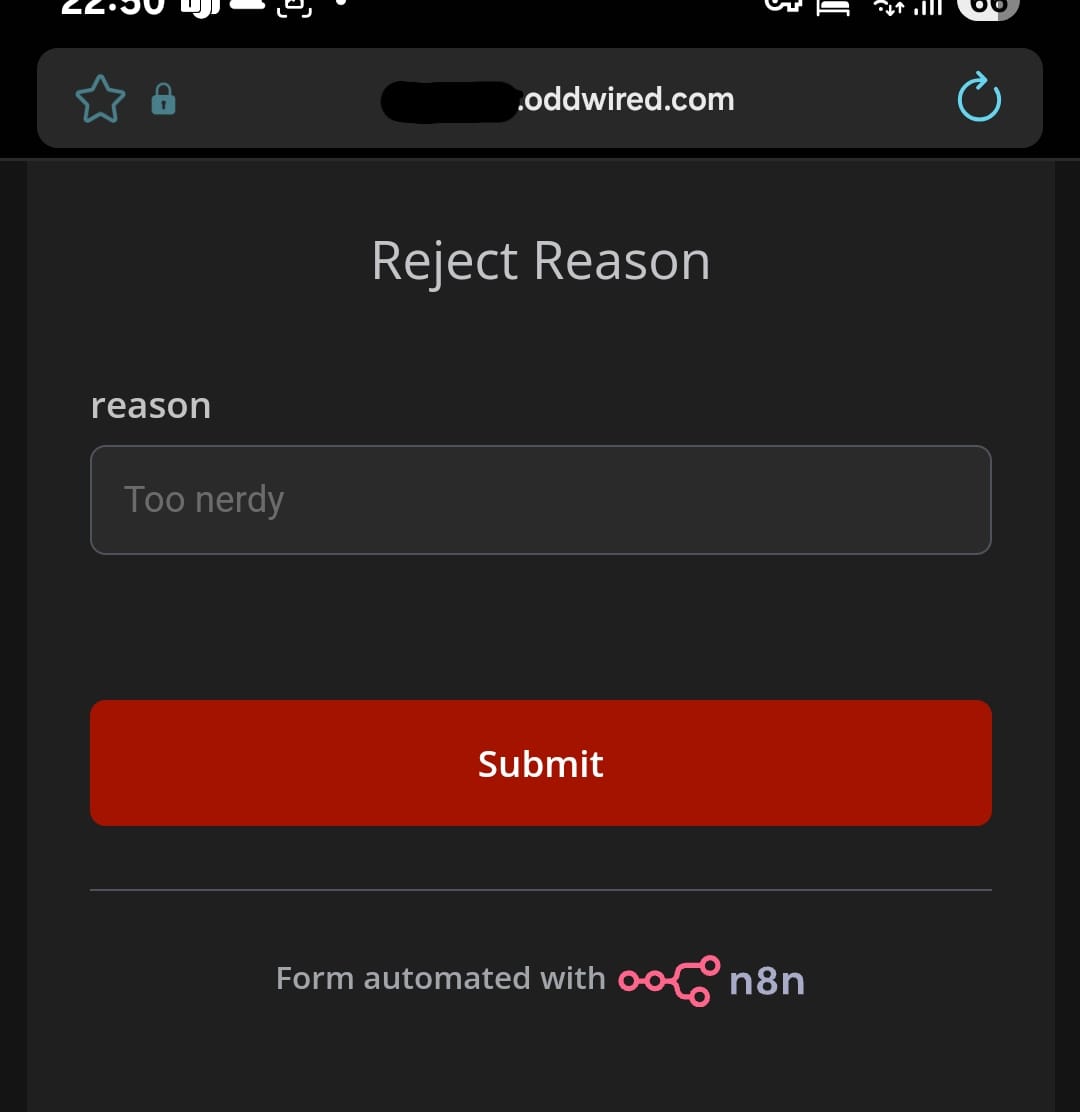
If I reject → loop back, including my comments so Llama 3 can improve the draft.
-
Post on LinkedIn – Publish the approved draft.
-
Mark as Processed – Save the blog post ID in PostgreSQL so it won’t be posted again.
Handling Rejections with Comments
I used an If node after the approval step.
If the answer was reject, I attached my feedback (e.g., “too stiff, make it more casual”).
That feedback went back into the Llama 3 node to generate a new draft.
The loop continues until I approve.
Lessons Learned
Setting up a LinkedIn developer app felt heavier than it should, but once it’s done, it works reliably.
Approval is essential — I don’t want a half-baked AI post going live without me seeing it first.
The loop-back system is worth the extra logic.
Closing Thoughts
This project is still evolving, but it feels like the right mix of automation and control. My homelab does the heavy lifting, and I just make the final call.
No more “I’ll post later” excuses.
